> ## Documentation Index
> Fetch the complete documentation index at: https://docs.nimbleway.com/llms.txt
> Use this file to discover all available pages before exploring further.
# Plugin Installation
> Install the Nimble plugin and turn your AI coding assistant into a web data expert
Install the Nimble plugin and turn Claude Code or Cursor into a web data powerhouse. Search, extract, scrape, and build reusable extraction agents, all from your AI coding assistant.
The plugin bundles the Nimble skills and an MCP server connection into a single package.
## What's Included
| Component | Description |
| - | - |
| **nimble-web-expert** skill | Get live web data instantly. Search, extract, map, and crawl via Nimble CLI. Also runs Extraction Templates and Web Search Agents |
| **MCP server config** | Pre-configured connection to the Nimble MCP server |
## Skills Overview
**Get web data immediately.** Fast, one-off extractions. Scrape pages, fetch URLs, search the web, crawl site sections. This is the only way your AI coding assistant can access live websites.
**Triggers:** Fetching any URL, scraping data, web search, bulk crawling, running pre-built agents
## Prerequisites
1. **Nimble CLI**: Install globally:
```bash theme={"system"}
npm i -g @nimble-way/nimble-cli
```
2. **Nimble API Key**: [Sign up](https://online.nimbleway.com/signup) and generate a key from your [Settings → API Keys](/nimble-sdk/admin/account-management#api-keys)
3. Set the environment variable:
```bash theme={"system"}
export NIMBLE_API_KEY="your-api-key-here"
```
Or add to `~/.claude/settings.json` (Claude Code):
```json theme={"system"}
{
"env": {
"NIMBLE_API_KEY": "your-api-key-here"
}
}
```
## Install by Platform
Installs the Nimble skills and configures the MCP server.
```bash theme={"system"}
claude plugin marketplace add Nimbleway/agent-skills && \
claude plugin install nimble@nimble-plugin-marketplace
```
Run `/mcp` and confirm `nimble` appears in your connected servers.
### Alternative: local plugin directory
Clone the repo and load it as a local plugin:
```bash theme={"system"}
git clone https://github.com/Nimbleway/agent-skills.git
claude --plugin-dir /path/to/agent-skills
```
One click, from the Anthropic and Partners directory inside Claude.
 Approve the scopes in your browser. There is no API key to paste or manage.
### Step-by-step, with screenshots
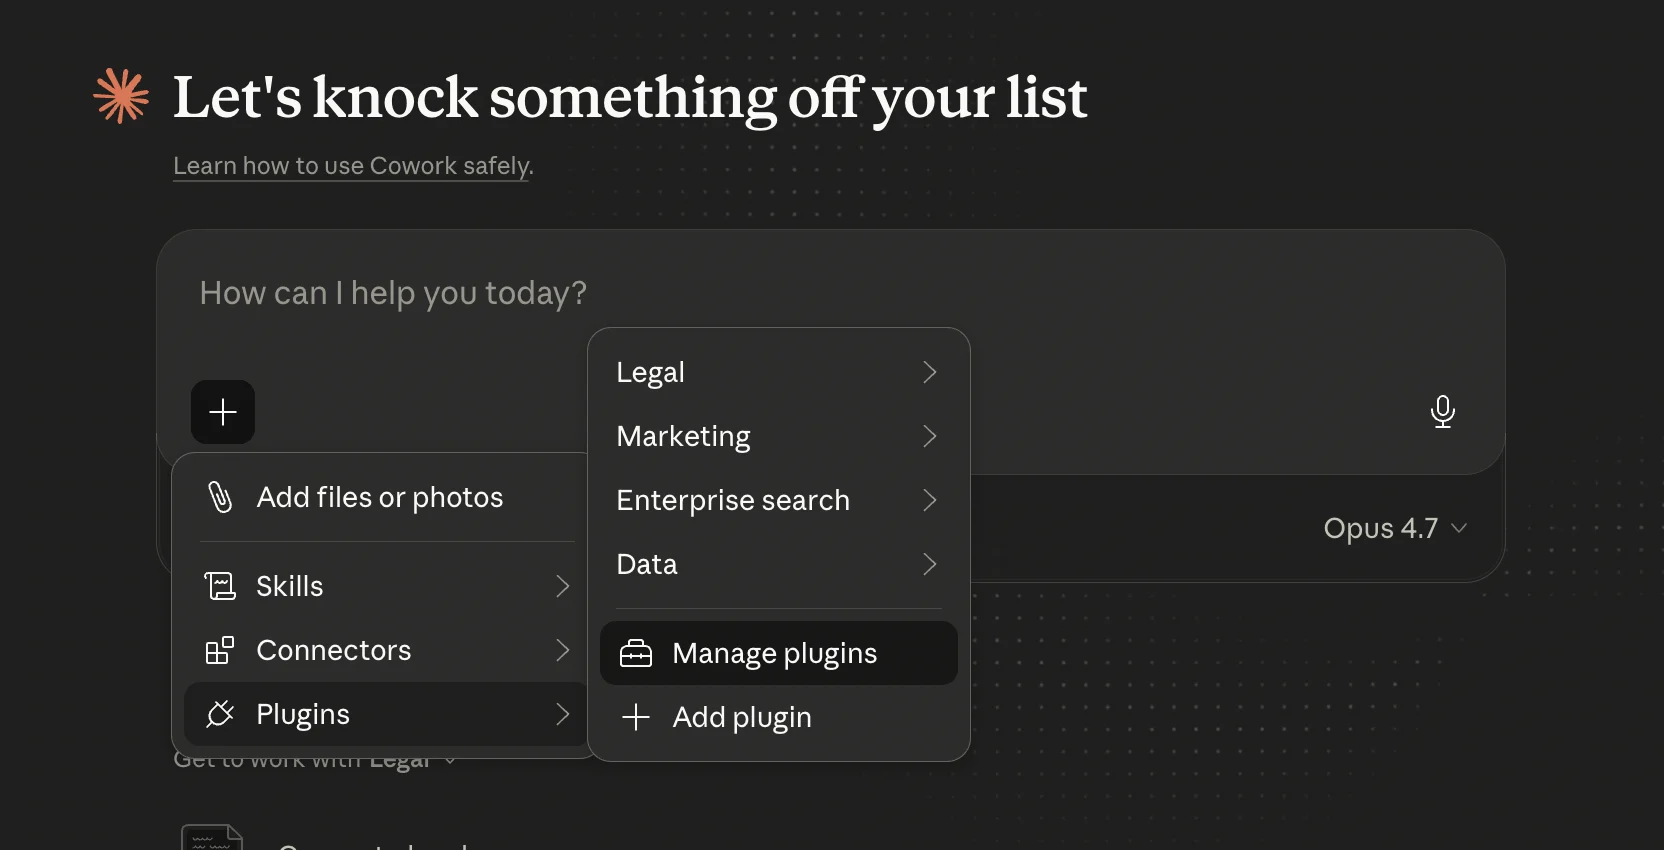
In a new Cowork task, click the **+** button, hover **Plugins**, then click **Manage plugins**.
Approve the scopes in your browser. There is no API key to paste or manage.
### Step-by-step, with screenshots
In a new Cowork task, click the **+** button, hover **Plugins**, then click **Manage plugins**.
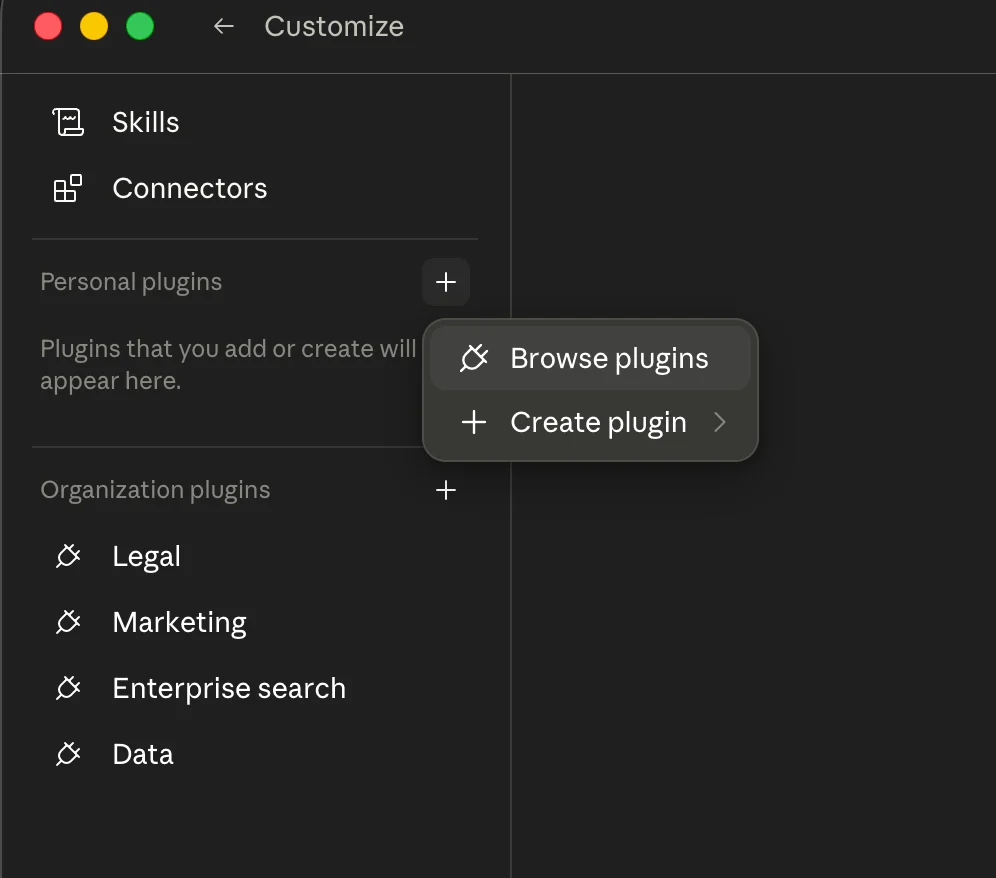
 Alternatively, from the **Customize** screen, click **+** next to **Personal plugins** and choose **Browse plugins**.
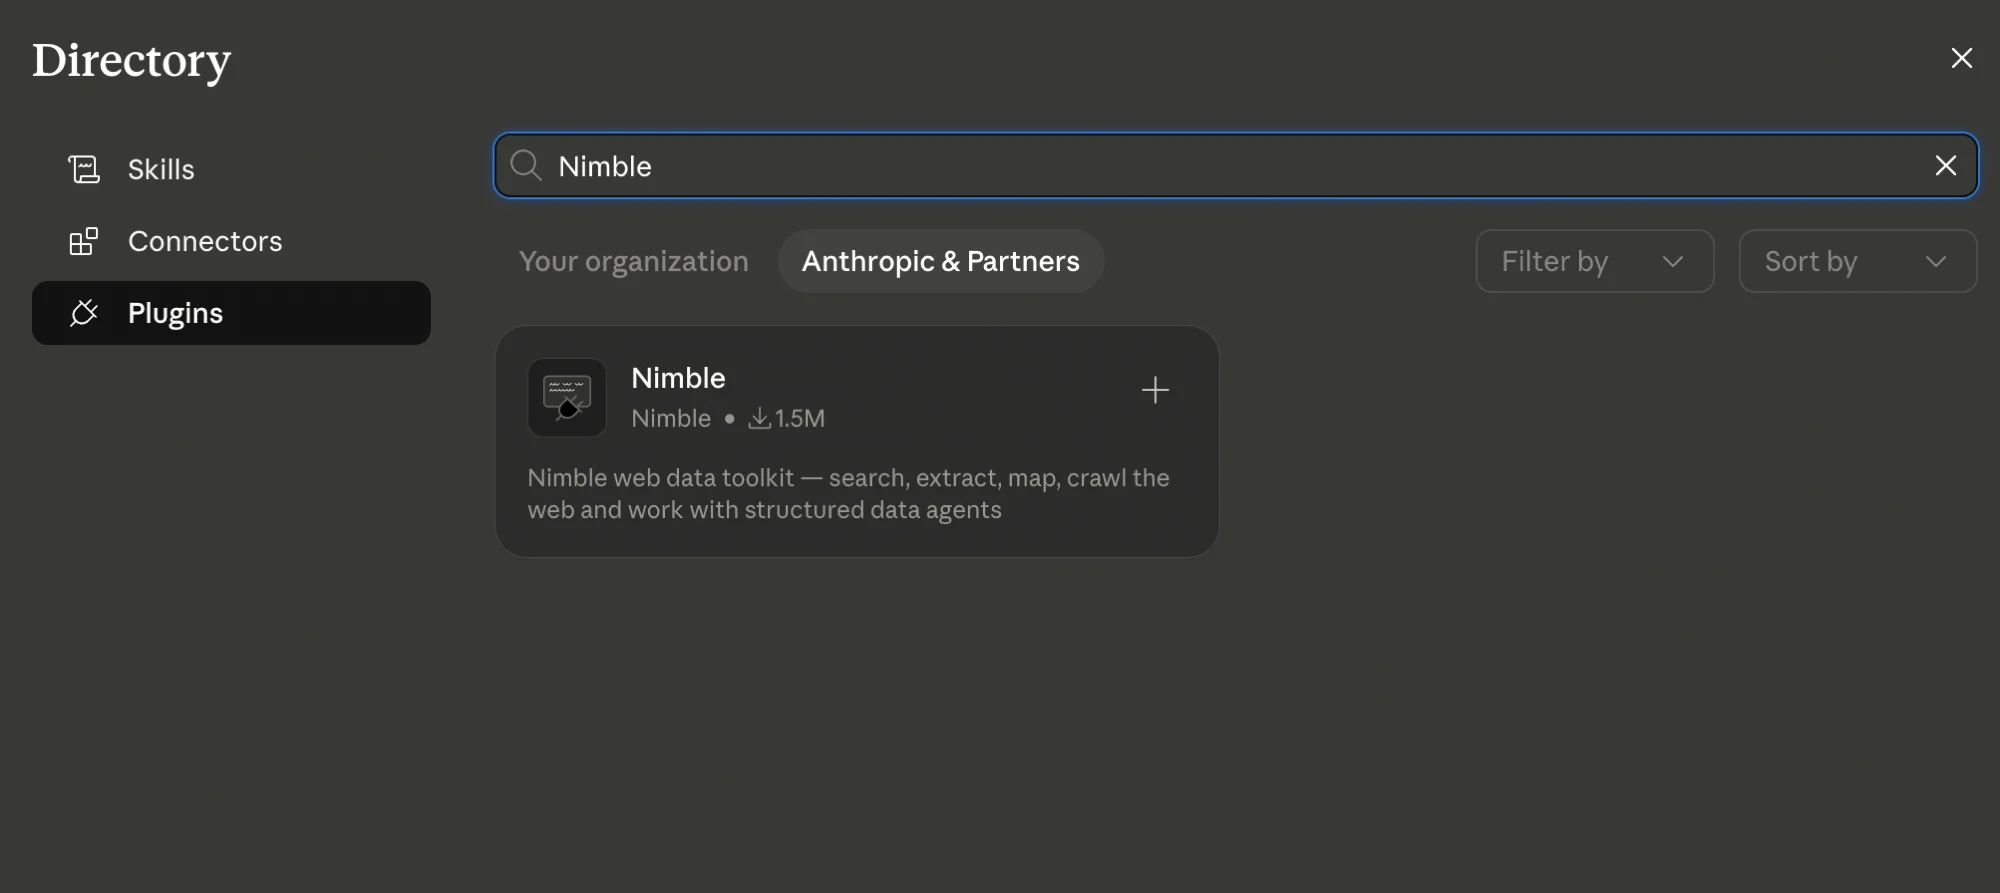
 Switch to the **Plugins** tab, select **Anthropic & Partners**, and search for `Nimble`.
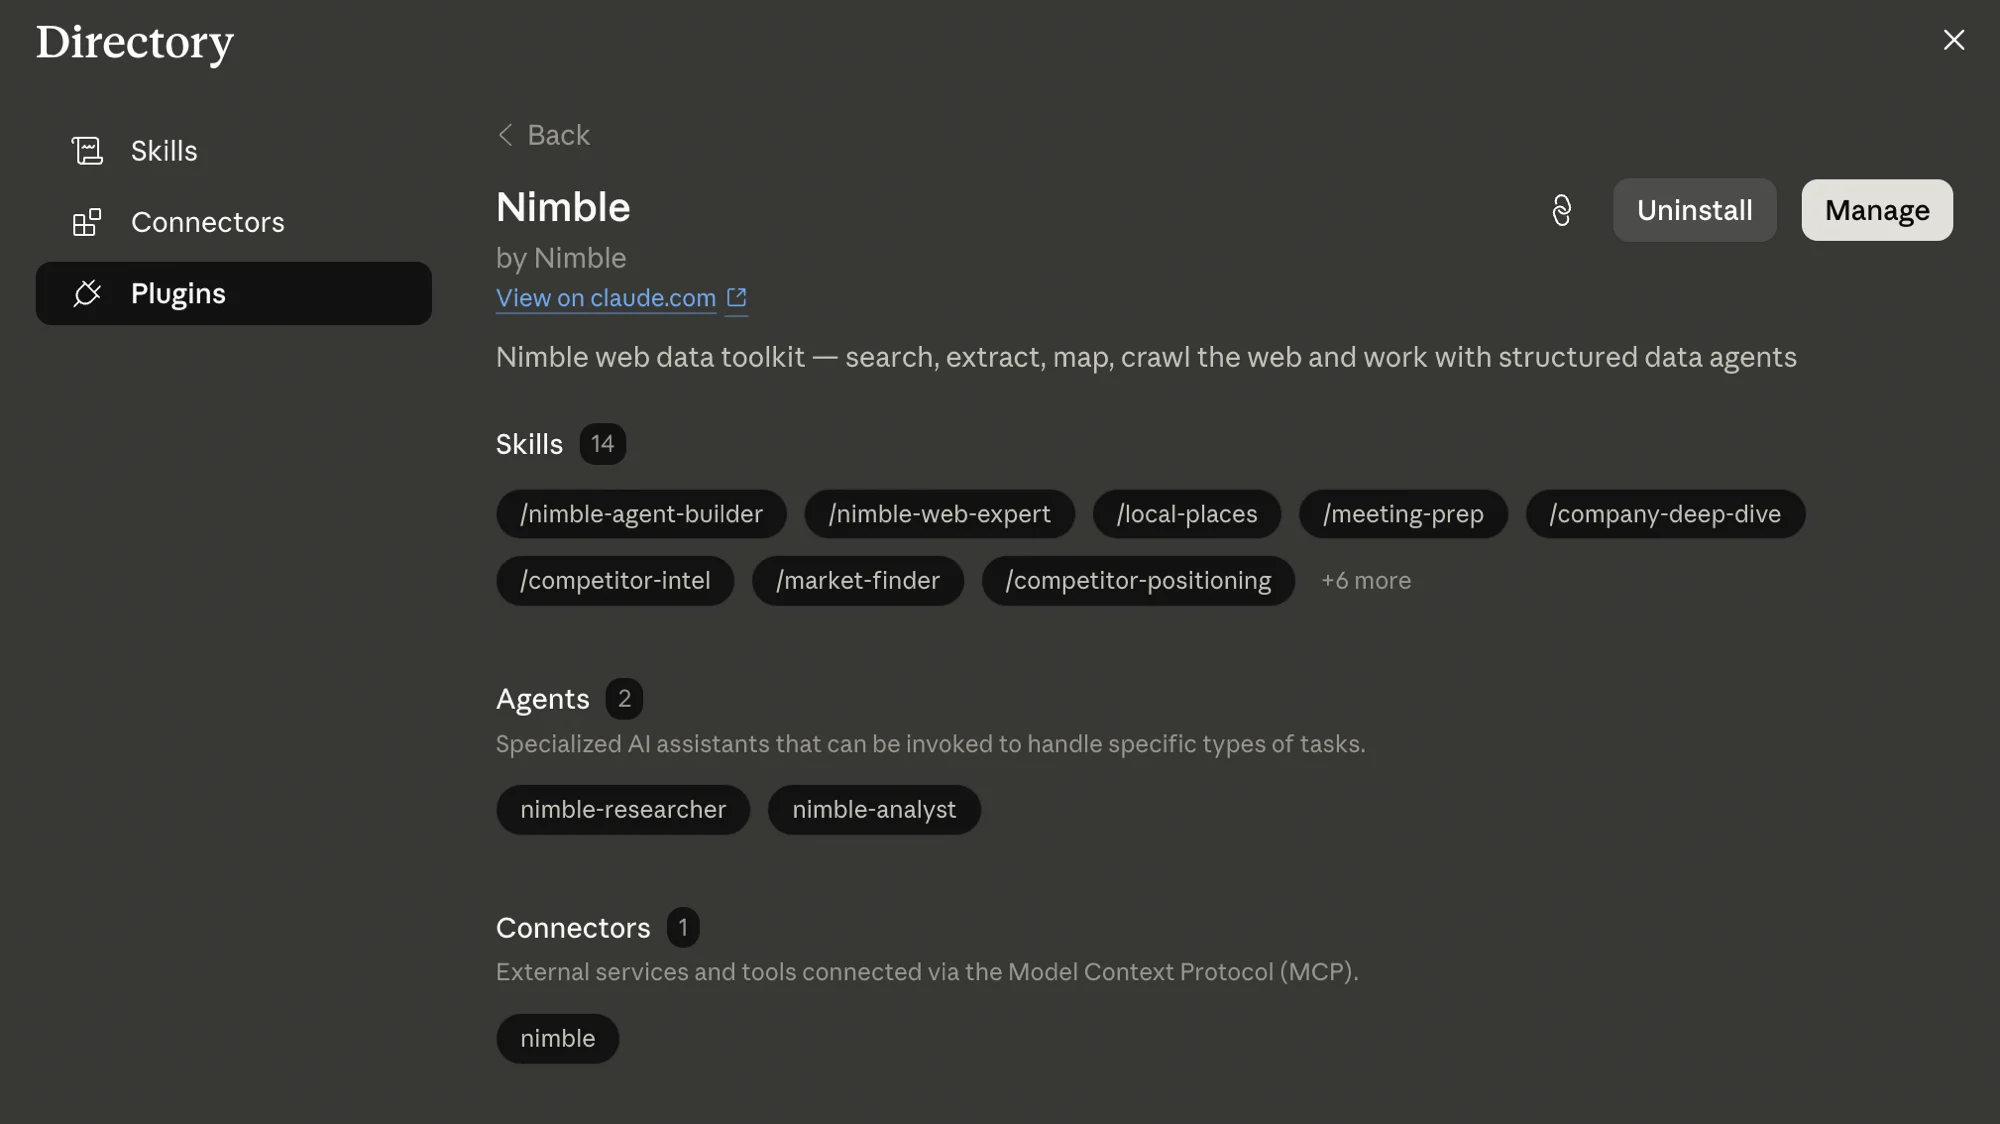
 Open the Nimble plugin and click **Install**. The plugin's skills, agents, and MCP connector register automatically.
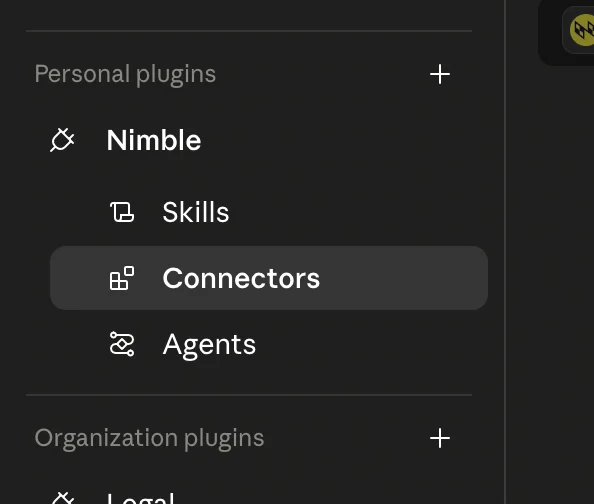
 Nimble now appears under **Personal plugins** in Customize, with **Skills**, **Connectors**, and **Agents** sub-sections.
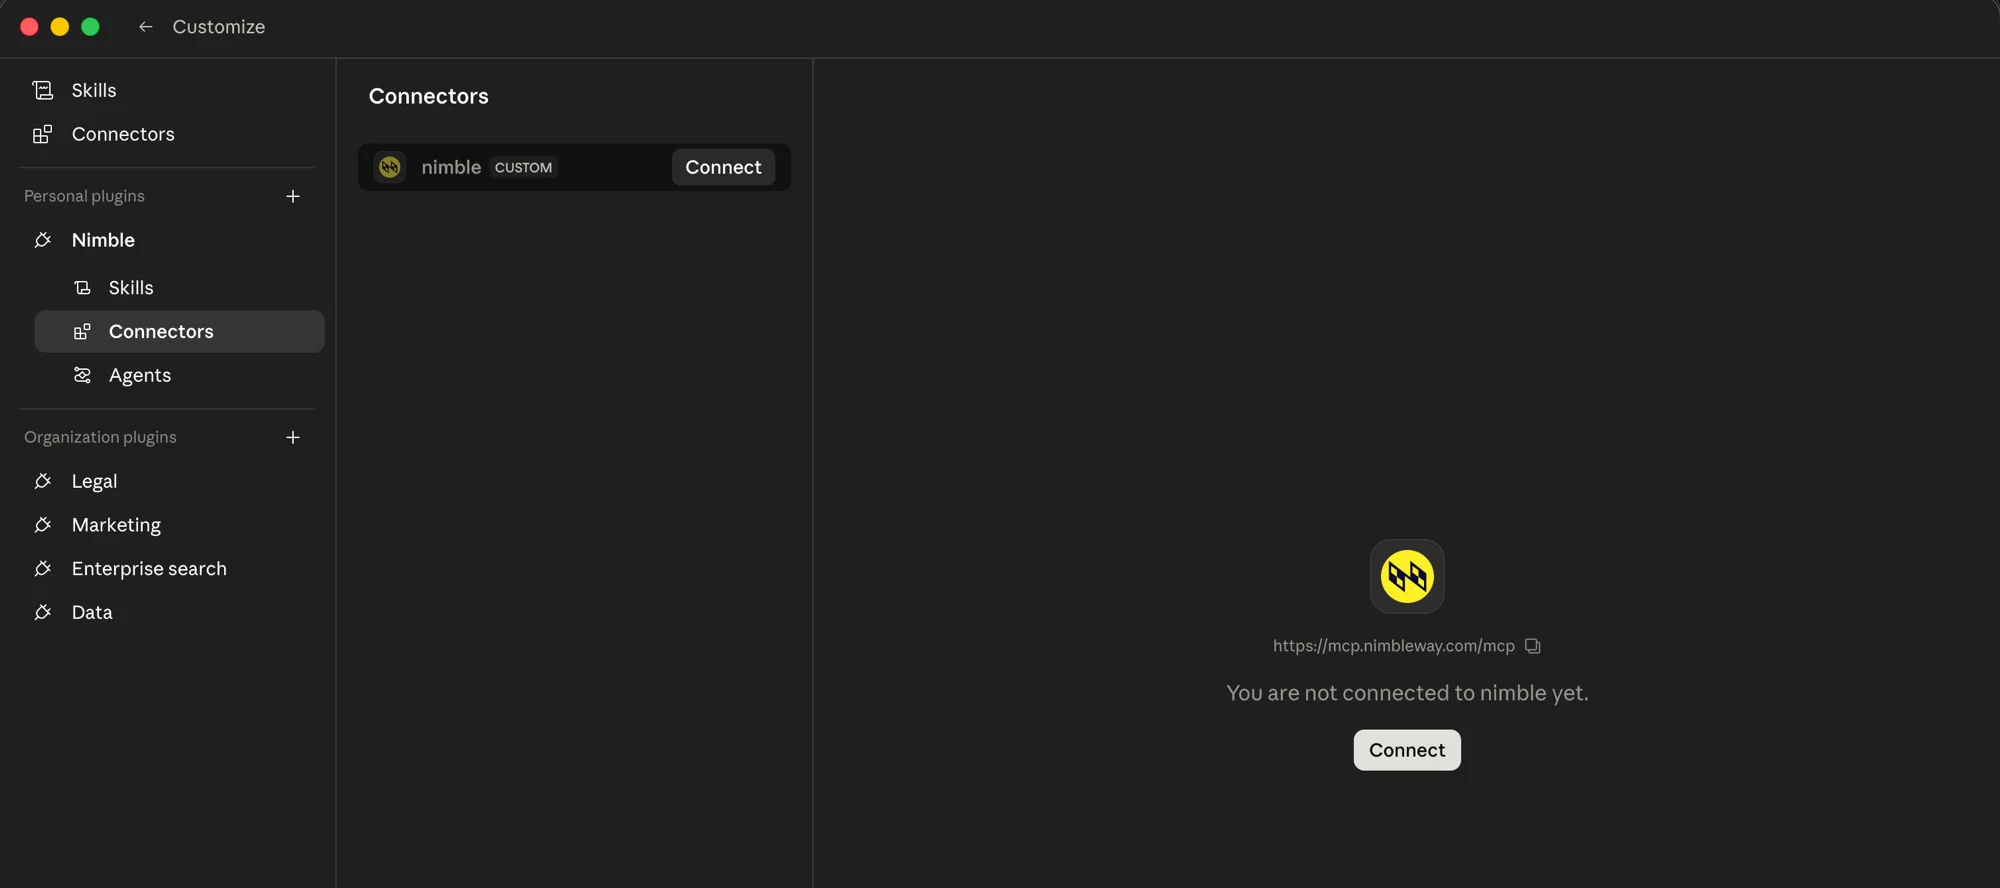
 Open **Connectors**, then click **Connect** to start OAuth.
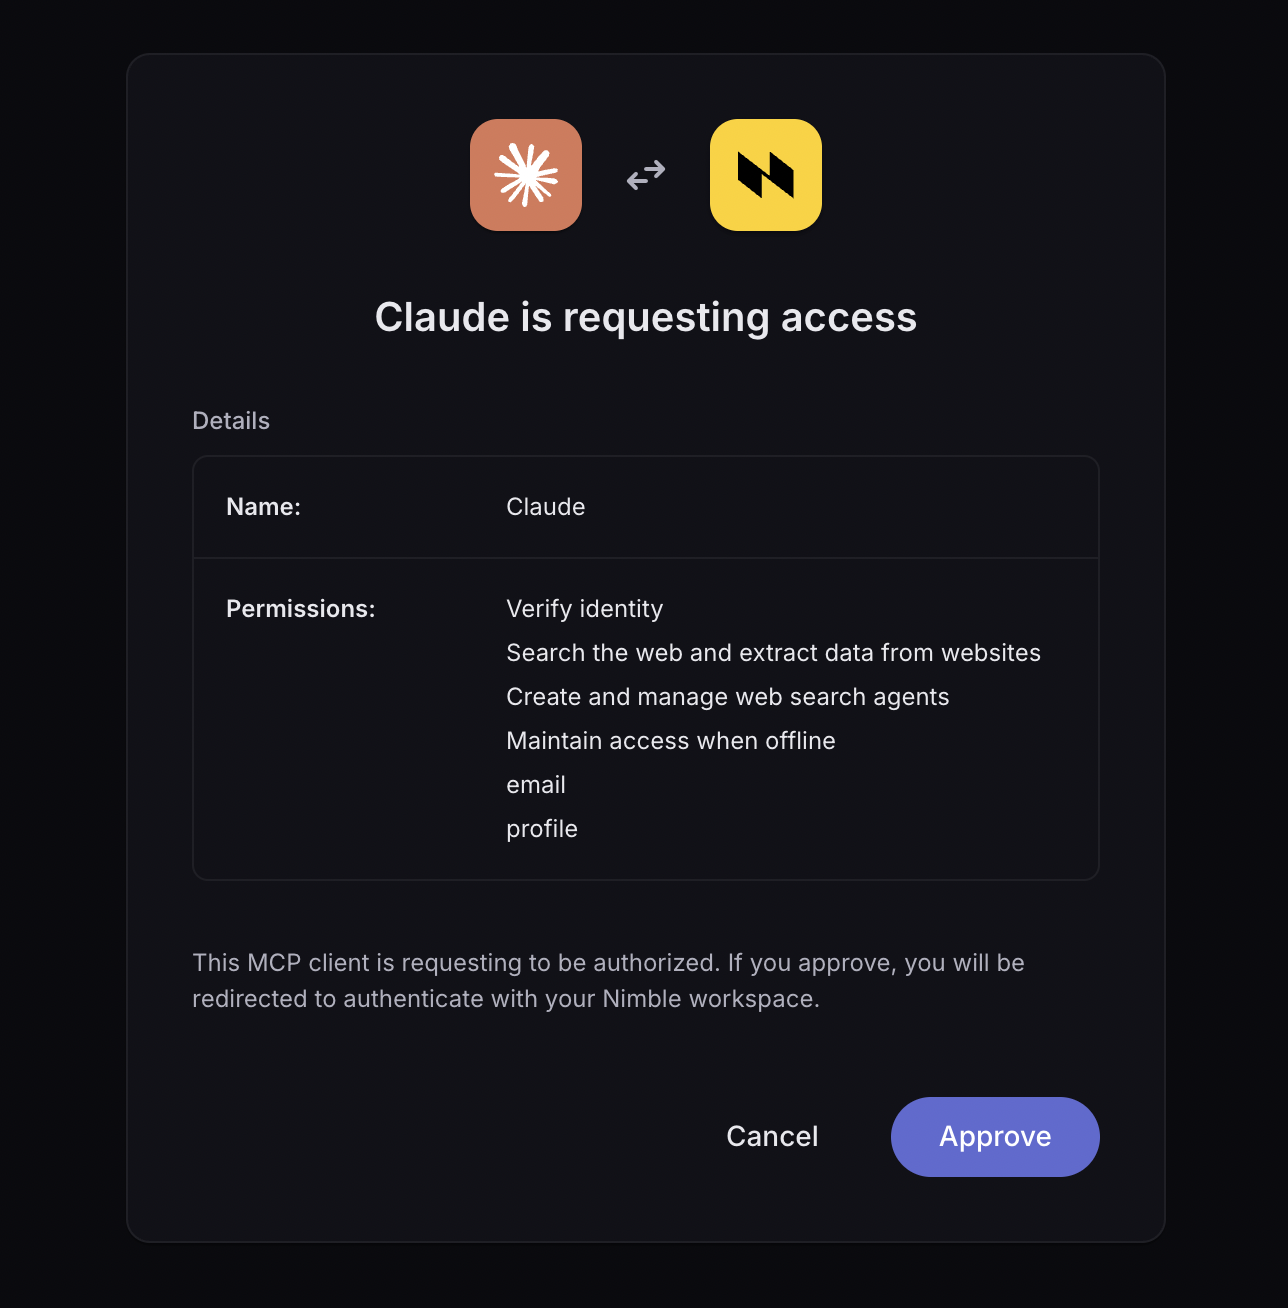
 Review the permissions Claude is requesting and click **Approve** to authenticate with your Nimble workspace.
 Once approved, the Nimble skills, agents, and MCP tools are live across your Cowork conversations.
For more on connecting Nimble to other Claude surfaces, see the [Claude AI Connectors guide](/integrations/connectors/anthropic/claude-connectors).
One click, then confirm the install in Cursor.
Once approved, the Nimble skills, agents, and MCP tools are live across your Cowork conversations.
For more on connecting Nimble to other Claude surfaces, see the [Claude AI Connectors guide](/integrations/connectors/anthropic/claude-connectors).
One click, then confirm the install in Cursor.
 Then replace `NIMBLE_API_KEY` in **Settings → MCP Servers → nimble-mcp-server** with your [Nimble API key](https://online.nimbleway.com/settings/api-keys). The deeplink ships a placeholder, not a key.
Teaches the agent which Nimble product fits a given job.
```bash theme={"system"}
npx skills add Nimbleway/agent-skills -a cursor
```
Open Settings, then MCP, and confirm `nimble-mcp-server` is listed.
Add to `.cursor/mcp.json` (project) or `~/.cursor/mcp.json` (global):
```json theme={"system"}
{
"mcpServers": {
"nimble-mcp-server": {
"url": "https://mcp.nimbleway.com/mcp",
"headers": {
"Authorization": "Bearer NIMBLE_API_KEY"
}
}
}
}
```
Restart Cursor for changes to take effect.
The `npx skills add` step above also copies the Cursor rules into your project.
Clone the repo and open the `agent-skills` folder in Cursor:
```bash theme={"system"}
git clone https://github.com/Nimbleway/agent-skills.git
```
Cursor auto-discovers:
* `skills/` the Nimble skills
* `rules/` Cursor rules (auto-loaded)
* `mcp.json` MCP server connection
**Early access via GitHub marketplace.** Nimble is not in OpenAI's public plugin directory. Adding the Nimble repository as a marketplace source installs the packaged plugin directly.
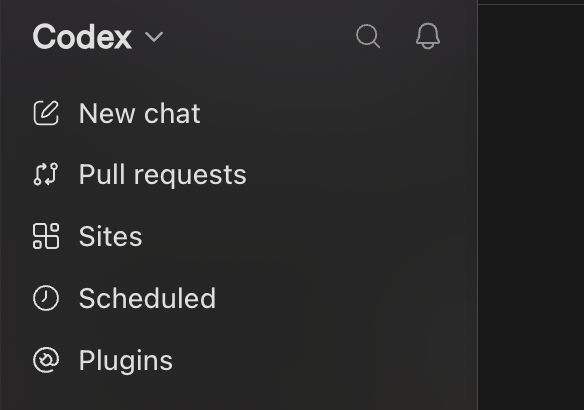
Click **Plugins** in the Codex left menu.
Then replace `NIMBLE_API_KEY` in **Settings → MCP Servers → nimble-mcp-server** with your [Nimble API key](https://online.nimbleway.com/settings/api-keys). The deeplink ships a placeholder, not a key.
Teaches the agent which Nimble product fits a given job.
```bash theme={"system"}
npx skills add Nimbleway/agent-skills -a cursor
```
Open Settings, then MCP, and confirm `nimble-mcp-server` is listed.
Add to `.cursor/mcp.json` (project) or `~/.cursor/mcp.json` (global):
```json theme={"system"}
{
"mcpServers": {
"nimble-mcp-server": {
"url": "https://mcp.nimbleway.com/mcp",
"headers": {
"Authorization": "Bearer NIMBLE_API_KEY"
}
}
}
}
```
Restart Cursor for changes to take effect.
The `npx skills add` step above also copies the Cursor rules into your project.
Clone the repo and open the `agent-skills` folder in Cursor:
```bash theme={"system"}
git clone https://github.com/Nimbleway/agent-skills.git
```
Cursor auto-discovers:
* `skills/` the Nimble skills
* `rules/` Cursor rules (auto-loaded)
* `mcp.json` MCP server connection
**Early access via GitHub marketplace.** Nimble is not in OpenAI's public plugin directory. Adding the Nimble repository as a marketplace source installs the packaged plugin directly.
Click **Plugins** in the Codex left menu.
 At the top right, click **Add**, then **Add a marketplace**.
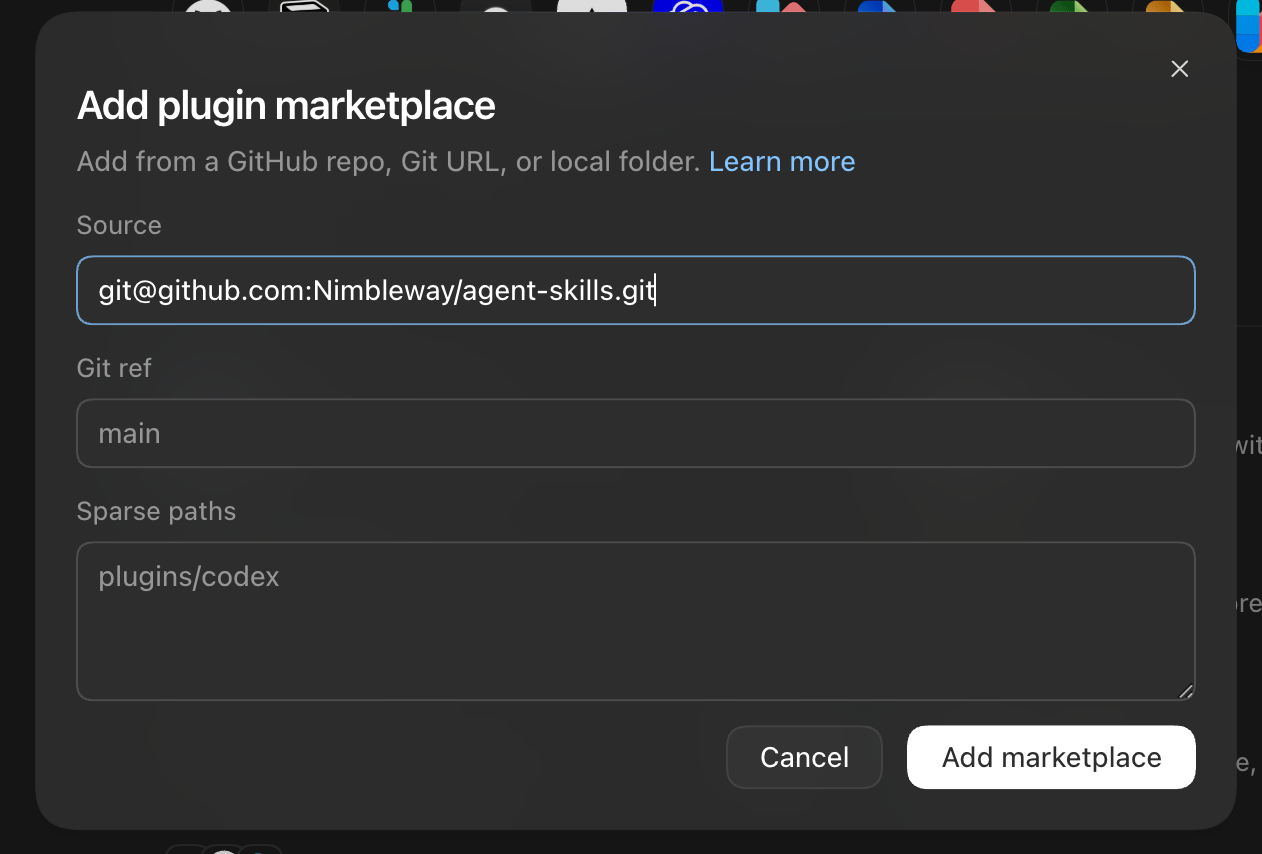
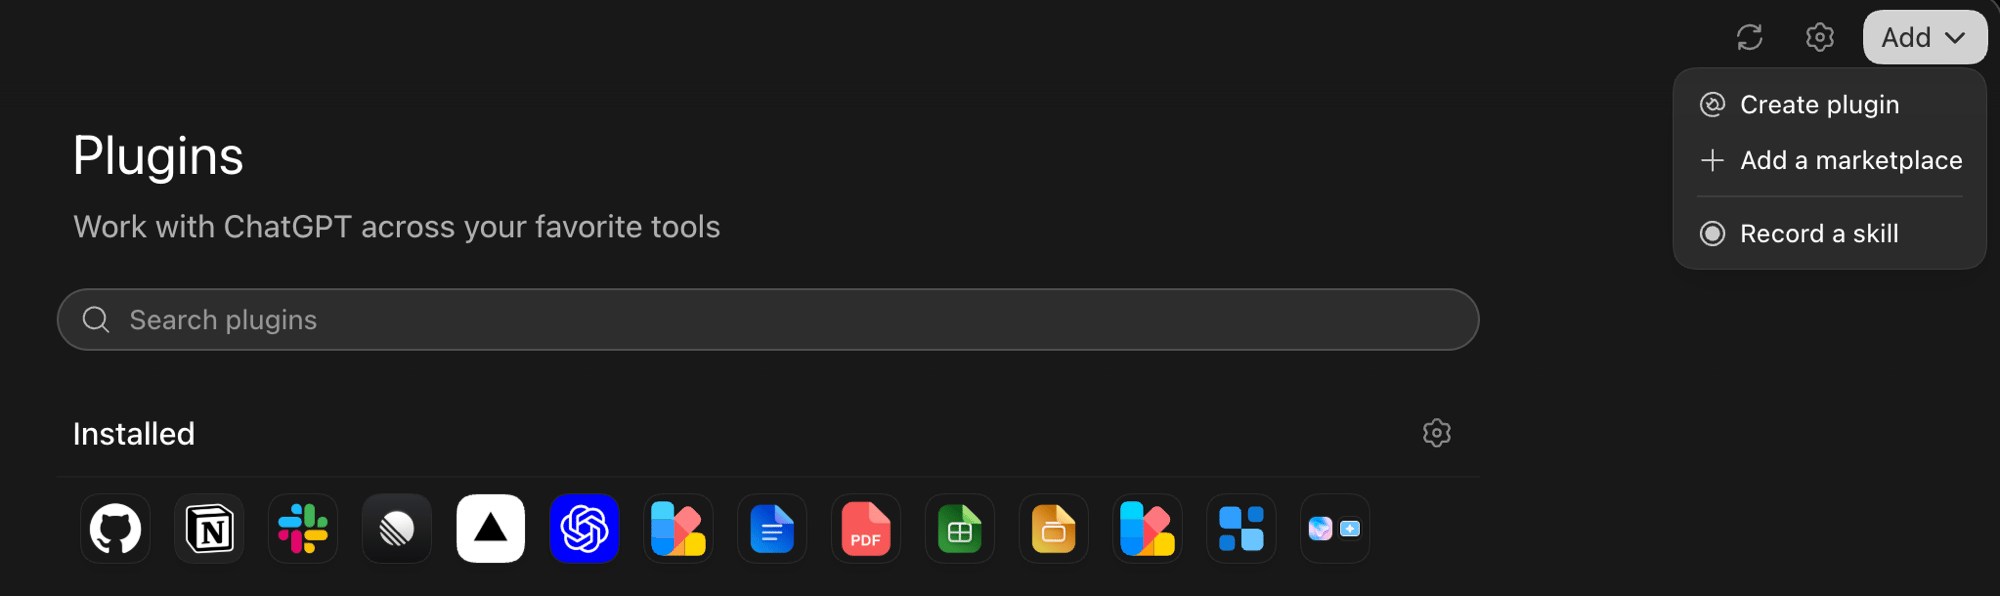 In **Add plugin marketplace**, paste this into **Source**, then click **Add marketplace**:
```text theme={"system"}
https://github.com/Nimbleway/agent-skills.git
```
Leave **Git ref** and **Sparse paths** empty. The repository is public, so no GitHub credentials and no local clone are needed.
In **Add plugin marketplace**, paste this into **Source**, then click **Add marketplace**:
```text theme={"system"}
https://github.com/Nimbleway/agent-skills.git
```
Leave **Git ref** and **Sparse paths** empty. The repository is public, so no GitHub credentials and no local clone are needed.
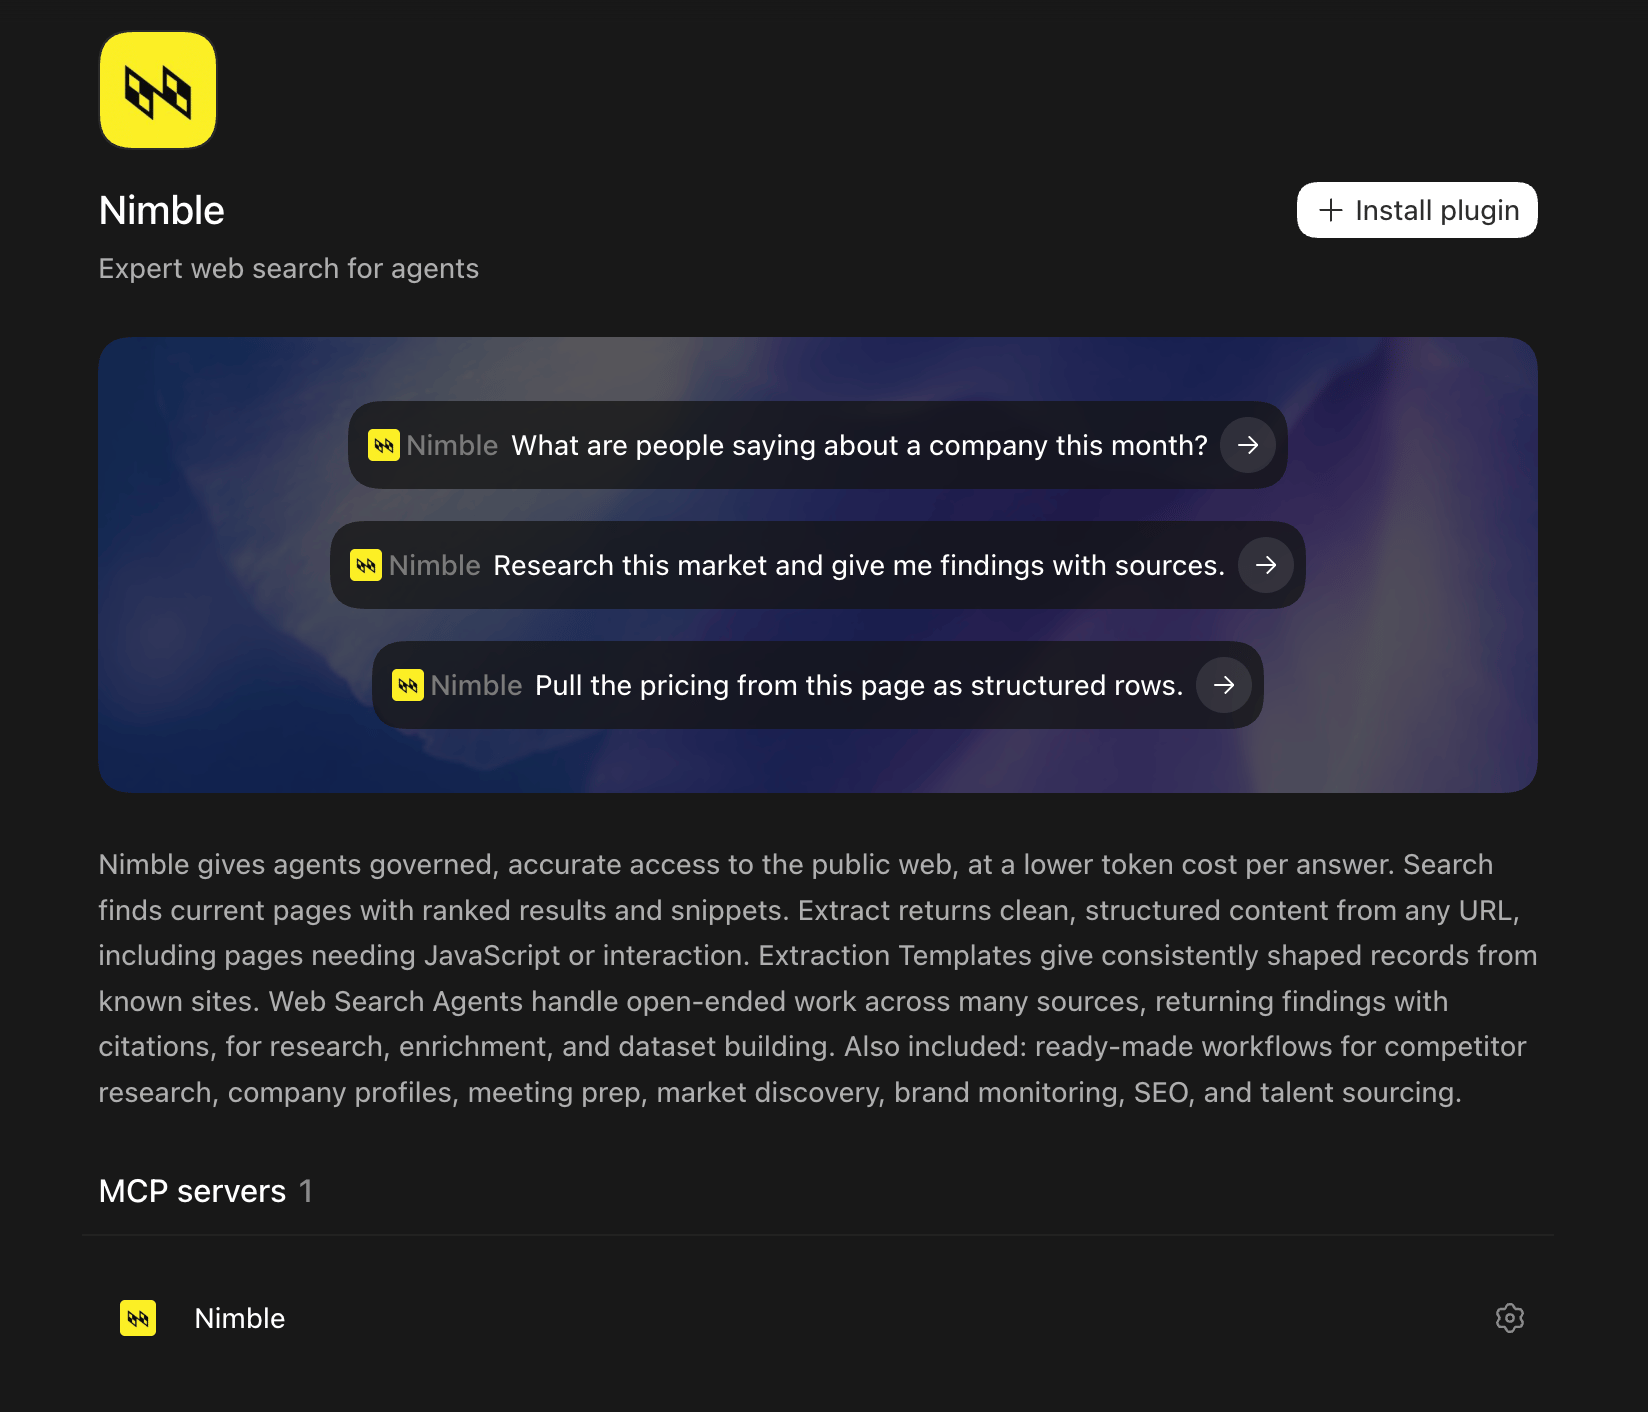
 Open **Nimble** and click **Install plugin**. This installs the Nimble skills and the hosted MCP connection together.
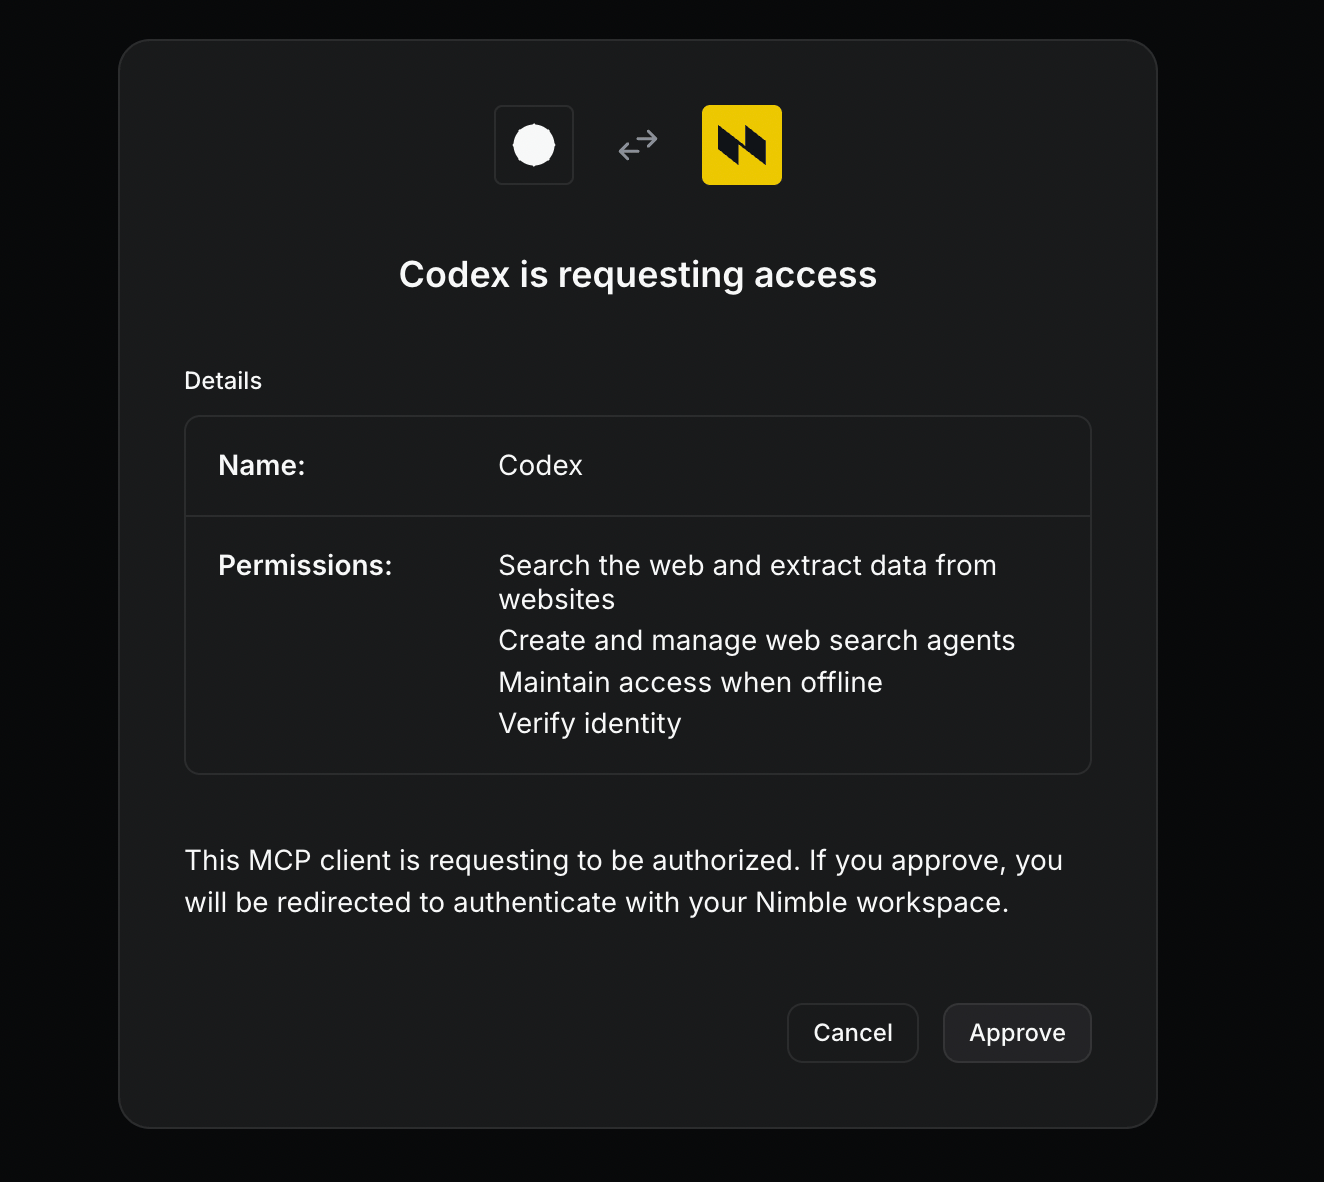
 **Codex is requesting access** opens in your browser. Click **Approve**, then authenticate with your Nimble workspace. There is no API key to paste or manage.
Codex asks to search the web and extract data from websites, create and manage Web Search Agents, maintain access when offline, and verify identity.
**Codex is requesting access** opens in your browser. Click **Approve**, then authenticate with your Nimble workspace. There is no API key to paste or manage.
Codex asks to search the web and extract data from websites, create and manage Web Search Agents, maintain access when offline, and verify identity.
 Bundled skills register on a new session. Start a new task, type `@nimble`, and select **Nimble**. A Nimble chip appears on the prompt, and everything you send in that task can reach the live web.
 Codex stores MCP configuration in `~/.codex/config.toml`, or a project-scoped `.codex/config.toml`. Add:
```toml theme={"system"}
[mcp_servers.nimble-mcp-server]
url = "https://mcp.nimbleway.com/mcp"
bearer_token_env_var = "NIMBLE_API_KEY"
```
Codex reads `NIMBLE_API_KEY` from your environment at runtime, so the key is never written to the config file.
Installs the Nimble skills into Codex's skill discovery paths (`~/.agents/skills/`).
```bash theme={"system"}
npx skills add Nimbleway/agent-skills -a codex
```
Run `/mcp` inside the Codex TUI to confirm the server, and `/skills` to confirm the skills. Restart Codex if they do not appear.
### Verify with a Web Search Agent
Works the same in Desktop and CLI. A `/mcp` check proves the connection. To prove Nimble actually reaches the live web, run a research prompt that has to cite its sources:
```text theme={"system"}
Full 2026 report on best AI Frameworks for building agents.
Include the source URL for every claim.
```
In Desktop, attach **Nimble** with `@` first so Codex routes the prompt to the plugin. A correct result is a [Web Search Agent](/nimble-sdk/web-search-agents/overview) run: Nimble reads current pages and returns findings where every claim carries the URL it came from. If the answer arrives with no URLs, the model answered from memory and Nimble is not being used.
### Troubleshooting
| Symptom | Where | Cause | Action |
| - | - | - | - |
| The marketplace source is rejected | Desktop | A typo in the URL, or no network route to github.com | Confirm the repo is reachable with `git ls-remote https://github.com/Nimbleway/agent-skills.git` |
| `@nimble` returns no matches | Desktop | Bundled skills register only on a new session | Start a new task, or restart Codex, then type `@nimble` again |
| The OAuth window never opens, or never returns | Desktop | A blocked popup, or no route to `mcp.nimbleway.com` | Allow popups for Codex and retry. Check connectivity with `curl -I https://mcp.nimbleway.com/mcp` |
| `/mcp` shows Nimble as not connected | Both | OAuth was cancelled or expired, or `NIMBLE_API_KEY` is unset in the CLI | Desktop: reconnect from the plugin's MCP settings and approve the scopes again. CLI: `echo $NIMBLE_API_KEY`, export it, then restart Codex |
| `/skills` lists nothing after `npx skills add` | CLI | The skills landed outside Codex's discovery path | Confirm the files exist under `~/.agents/skills/` and re-run with `-a codex` |
The packaged plugin is built from the [Nimble agent-skills repository](https://github.com/Nimbleway/agent-skills).
[Cortex Code](https://docs.snowflake.com/en/user-guide/cortex-code/cortex-code), Snowflake's native AI coding agent for the terminal, installs the Nimble MCP server with a single command. OAuth handles authentication — no API key required.
Adds the Nimble MCP server to Snowflake's terminal agent.
```bash theme={"system"}
cortex mcp add nimble https://mcp.nimbleway.com/mcp --transport http
```
No `Authorization` header is needed. The Nimble MCP server advertises OAuth and Cortex Code runs the flow on first connection, storing tokens in your OS keychain.
Run `cortex mcp list` to confirm, then `cortex mcp start`.
Cortex Code writes the server to `~/.snowflake/cortex/mcp.json`. Once `nimble` shows as connected, its tools are namespaced as `mcp__nimble__search`, `mcp__nimble__extract`, `mcp__nimble__map`, and `mcp__nimble__crawl`.
For organization-wide rollout via managed settings, see the [full Cortex Code integration guide](/integrations/partnerships/snowflake/cortex-code).
Installs the Nimble skills into your project.
```bash theme={"system"}
npx skills add Nimbleway/agent-skills
```
Run `npx skills add Nimbleway/agent-skills --list` to see what was installed.
The skills reach Web Search Agents and Extract Templates through the MCP server. After installing via `npx skills`, connect the server manually:
```bash theme={"system"}
claude mcp add --transport http nimble-mcp-server https://mcp.nimbleway.com/mcp \
--header "Authorization: Bearer ${NIMBLE_API_KEY}"
```
## What's Next
End-to-end tutorial: competitive price analysis across Amazon, Walmart, and
Nike, from a single prompt
Prefer a visual interface? Create agents in the browser
Need enterprise scale or managed delivery?
View the full plugin source on GitHub
This documentation is built and hosted on [Mintlify](https://mintlify.com), a developer documentation platform.
Codex stores MCP configuration in `~/.codex/config.toml`, or a project-scoped `.codex/config.toml`. Add:
```toml theme={"system"}
[mcp_servers.nimble-mcp-server]
url = "https://mcp.nimbleway.com/mcp"
bearer_token_env_var = "NIMBLE_API_KEY"
```
Codex reads `NIMBLE_API_KEY` from your environment at runtime, so the key is never written to the config file.
Installs the Nimble skills into Codex's skill discovery paths (`~/.agents/skills/`).
```bash theme={"system"}
npx skills add Nimbleway/agent-skills -a codex
```
Run `/mcp` inside the Codex TUI to confirm the server, and `/skills` to confirm the skills. Restart Codex if they do not appear.
### Verify with a Web Search Agent
Works the same in Desktop and CLI. A `/mcp` check proves the connection. To prove Nimble actually reaches the live web, run a research prompt that has to cite its sources:
```text theme={"system"}
Full 2026 report on best AI Frameworks for building agents.
Include the source URL for every claim.
```
In Desktop, attach **Nimble** with `@` first so Codex routes the prompt to the plugin. A correct result is a [Web Search Agent](/nimble-sdk/web-search-agents/overview) run: Nimble reads current pages and returns findings where every claim carries the URL it came from. If the answer arrives with no URLs, the model answered from memory and Nimble is not being used.
### Troubleshooting
| Symptom | Where | Cause | Action |
| - | - | - | - |
| The marketplace source is rejected | Desktop | A typo in the URL, or no network route to github.com | Confirm the repo is reachable with `git ls-remote https://github.com/Nimbleway/agent-skills.git` |
| `@nimble` returns no matches | Desktop | Bundled skills register only on a new session | Start a new task, or restart Codex, then type `@nimble` again |
| The OAuth window never opens, or never returns | Desktop | A blocked popup, or no route to `mcp.nimbleway.com` | Allow popups for Codex and retry. Check connectivity with `curl -I https://mcp.nimbleway.com/mcp` |
| `/mcp` shows Nimble as not connected | Both | OAuth was cancelled or expired, or `NIMBLE_API_KEY` is unset in the CLI | Desktop: reconnect from the plugin's MCP settings and approve the scopes again. CLI: `echo $NIMBLE_API_KEY`, export it, then restart Codex |
| `/skills` lists nothing after `npx skills add` | CLI | The skills landed outside Codex's discovery path | Confirm the files exist under `~/.agents/skills/` and re-run with `-a codex` |
The packaged plugin is built from the [Nimble agent-skills repository](https://github.com/Nimbleway/agent-skills).
[Cortex Code](https://docs.snowflake.com/en/user-guide/cortex-code/cortex-code), Snowflake's native AI coding agent for the terminal, installs the Nimble MCP server with a single command. OAuth handles authentication — no API key required.
Adds the Nimble MCP server to Snowflake's terminal agent.
```bash theme={"system"}
cortex mcp add nimble https://mcp.nimbleway.com/mcp --transport http
```
No `Authorization` header is needed. The Nimble MCP server advertises OAuth and Cortex Code runs the flow on first connection, storing tokens in your OS keychain.
Run `cortex mcp list` to confirm, then `cortex mcp start`.
Cortex Code writes the server to `~/.snowflake/cortex/mcp.json`. Once `nimble` shows as connected, its tools are namespaced as `mcp__nimble__search`, `mcp__nimble__extract`, `mcp__nimble__map`, and `mcp__nimble__crawl`.
For organization-wide rollout via managed settings, see the [full Cortex Code integration guide](/integrations/partnerships/snowflake/cortex-code).
Installs the Nimble skills into your project.
```bash theme={"system"}
npx skills add Nimbleway/agent-skills
```
Run `npx skills add Nimbleway/agent-skills --list` to see what was installed.
The skills reach Web Search Agents and Extract Templates through the MCP server. After installing via `npx skills`, connect the server manually:
```bash theme={"system"}
claude mcp add --transport http nimble-mcp-server https://mcp.nimbleway.com/mcp \
--header "Authorization: Bearer ${NIMBLE_API_KEY}"
```
## What's Next
End-to-end tutorial: competitive price analysis across Amazon, Walmart, and
Nike, from a single prompt
Prefer a visual interface? Create agents in the browser
Need enterprise scale or managed delivery?
View the full plugin source on GitHub
This documentation is built and hosted on [Mintlify](https://mintlify.com), a developer documentation platform.